Canvas
Canvas is a 2D drawing API. Essentially the browser gives you a rectanglar area on the screen that you can draw into. You can draw lines, shapes, images, text; pretty much anything you want.
HTML Canvas Tag
First we need to know how to setup a canvas. By using a canvas tag, you can specify it width and height property (width and height units are in pixels.). Other way to do this is by using Javascript, adding a ID selector to the Canvas HTML tag and query this tag by id. After grabbing the DOM element we can specify the width and height.
let
  canvas = document.getElementById('display'),
  display = canvas.getContext('2d')

display.width = 600
display.height = 300
Draw Canvas After Document Loaded
In JavaScript, we need to ensure that the canvas will display our graphic, so we should draw canvas after the HTML document is loaded. You can done with Vanilla JavaScript.
2D Basic Shapes
Canvas Context
In HTML Canvas, we need to have a canvas context object to draw canvas. We based on drawing 2D graphics, which means there are 3D context based on WebGL. However, we will focus on drawing 2D graphics, let’s create the 2D canvas context object.
The ‘'’CanvasRenderingContext2D’’’ interface is used for drawing rectangles, text, images and other objects onto the canvas element. It provides the 2D rendering context for the drawing surface of a
let
  canvas = document.getElementById('display'),
  display = canvas.getContext('2d')

display.width = 600
display.height = 300
Coordinate in Canvas
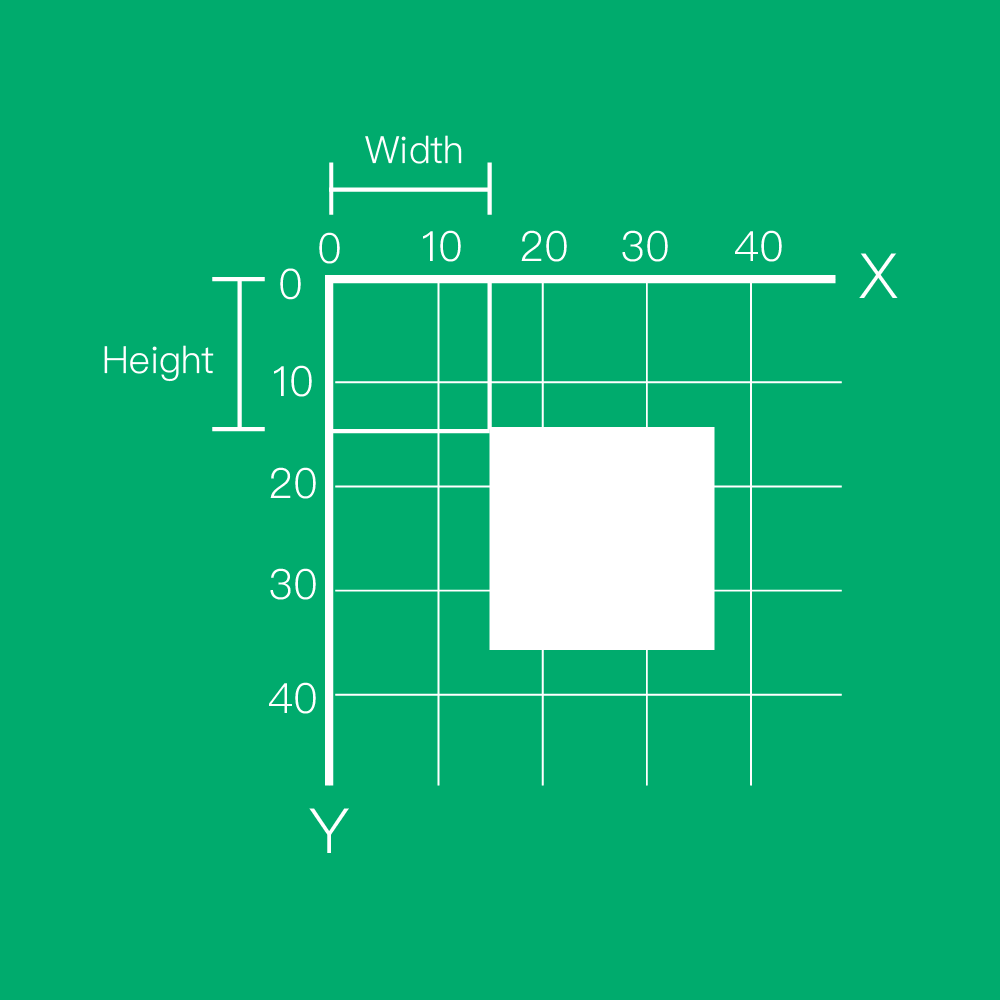
In order to know where to draw your graphic, the illustration shows the coordination of the canvas. Both width and height are in unit of pixels. The origin (point (x = 0, y = 0)) is at the left-top side of the canvas. The white square is located at about (x = 15, y =15).
Before we draw a pattern, we must know where we will draw the pattern. The above figure is a schematic diagram of the coordinate system of Canvas. The coordinate units of both axes are pixels, and the upper left corner of Canvas is its origin (coordinates (x = 0, y = 0)). Then the white square coordinates in the diagram are (x = 15, y = 15).
Drawing a Rectangle
Canvas provide a simple method to draw rectangle, which is fillRect() method or strokeRect() method. The fillRect() method draws a filled rectangle and the strokeRect() method draws the outline of a rectangle. Both of the method need the specify four parameters, the position X, position Y of the rectangle and both the width and height of the rectangle.
let
  canvas = document.getElementById('display'),
  display = canvas.getContext('2d')

display.fillRect(100, 100, 400, 300)
display.strokeRect(50, 250, 50, 50)
Canvas context object has two properties, they are fillStyle and strokeStyle. When drawing filled shapes, input a colour code into fillStyle property, it will change the style of the filled shapes. On the other hand, the strokeStyle property controls the stroked shapes.
The canvas background object has two properties, which can change the solid pattern and the style of the border pattern, respectively. fillStyle Can change the color of the solid pattern, and strokeStyle the pattern is changed border color.
let
  canvas = document.getElementById('display'),
  display = canvas.getContext('2d')

display.fillStyle = '#DB2C12'
display.fillRect(100, 100, 400, 300)
Drawing Lines (Paths)
First, we need to tell canvas we are going to draw a line by using the canvas context method beginPath(), it requires no input parameter. beginPath() turns the canvas context object into a series of command that can draw lines.
Second, we need to move to the location where we need to start drawing line, with moveTo() method, it requires the position X and Y two parameters.
Third, with lineTo() method and specify the location position X and Y as two parameters, we can draw a line (from the location where we moved to), and you can always add more lineTo() command to draw more lines as you wish.
During drawing the lines, you can choose to close the path with closePath() method. The method connects the final position to the starting position with a line and returns the command state back to normal canvas context object.
Finally, you can choose stroke() method to make your lines (or paths) into outline, or you can use fill() method to fill the path into a solid filled shape.
let
  canvas = document.getElementById('display'),
  display = canvas.getContext('2d')

canvas.height = innerHeight
canvas.width = innerWidth

// Triangle
display.beginPath()
display.moveTo(10, 10)
display.lineTo(10, 200)
display.lineTo(200, 10)
display.closePath()

// Outline
display.lineWidth = 10
display.strokeStyle = '#008799'
display.stroke()

// Fill color
display.fillStyle = '#DB2C12'
display.fill()
let
  canvas = document.getElementById('display'),
  display = canvas.getContext('2d')

canvas.height = innerHeight
canvas.width = innerWidth

const drawLine = function(fromX, fromY, toX, toY, style, width) {
  display.beginPath()
  display.moveTo(fromX, fromY)
  display.lineTo(toX, toY)
  display.lineWidth = width ? width : 3
  display.strokeStyle = style ? style : '#fff'
  display.stroke()
}

drawLine(10, 10, 10, 100, '#DB2C12', 2)
drawLine(10, 100, 100, 100, '#DB2C12', 2)
Drawing Arcs ans Circular Shapes
arc() This function can easily draw the arc line and it requires several parameters. The two parameter angleStart and angleEnd are number type value with unit of radian; The last argument isAnticlockwise is optional and is a type of boolean value. The default value is false, which means that the arc() function is set to draw clockwise in default.
%20function.png)
If you want to use the unit degree as the argument unit in the arc() function, you can use this helper function to transform the degree to radian unit.
const degToRad = (degree) => (degree / 180 * Math.PI)
const deg180 = degToRad(180)
console.log(deg180)
let
  canvas = document.getElementById('display'),
  display = canvas.getContext('2d'),
  startRadian,
  endRadian

canvas.height = innerHeight
canvas.width = innerWidth

const degToRad = (degree) => (degree / 180 * Math.PI)
startRadian = degToRad(270)
endRadian = degToRad(0.737 * 360 - 90)

display.beginPath()
display.arc(250, 250, 150, startRadian, endRadian)
display.lineTo(250, 250)
display.fillStyle = '#DB2C12'
display.fill()
Drawing Circles
Since we can use the arc() function to draw sectors, we can also use it to draw circles. Hence, here are other helper functions which can let you draw stroked or filled circles in a simple way.
let
  canvas = document.getElementById('display'),
  display = canvas.getContext('2d')

canvas.height = innerHeight
canvas.width = innerWidth

const drawFilledCircle = function(centerX, centerY, radius, style) {
  display.fillStyle = style ? style : '#fff'
  display.beginPath()
  display.arc(centerX, centerY, radius, 0, Math.PI * 2)
  display.fill()
}

const drawStrokedCircle = function(centerX, centerY, radius, width, style) {
  display.lineWidth   = width ? width : 3
  display.strokeStyle = style ? style : '#fff'
  display.beginPath()
  display.arc(centerX, centerY, radius, 0, Math.PI * 2)
  display.stroke()
}

drawFilledCircle(30, 30, 20, '#DB2C12')
drawStrokedCircle(30, 80, 20, 2, '#DB2C12')
Adding Text to HTML5 Canvas
The Font Property of Canvas Context Object
Before adding text, we need to setup the font style. Naturally, here comes a property called font in canvas context object. You can assign the information of the font style into this property. For example, assign the font style ‘Times New Roman’ with 20 pixels into canvas context object.
Colour of the Font
About the colour style of the font, same as drawing shapes in canvas, you can merely use the property fillStyle (of the canvas context object) to assign the colour of the font. For example, we want to use the white font in our pie chart.
Adding Font with fillText() Function
The fillText() function in canvas can serve you well. It requires several arguments as shown below.
let
  canvas = document.getElementById('display'),
  display = canvas.getContext('2d')

canvas.height = innerHeight
canvas.width = innerWidth

display.font = '20px Times New Roman'
display.fillStyle = '#DB2C12'
display.fillText('Hello Worlds', 10, 30)
Animations
In order to produce animation, we must use a technique aptly named redrawing, which is where we repeatedly draw something, in this case the element, to the screen as often as possible. In the past, this was done using standard delay functions, such as setTimeout and setInterval, but now we can use a function called requestAnimationFrame. However, because this is still not fully supported, we must accommodate for various browser implementations, and replicate it if it doesn’t exist at all.
let requestAnimationFrame =
	window.requestAnimationFrame ||
  window.webkitRequestAnimationFrame ||
  window.mozRequestAnimationFrame ||
  window.msRequestAnimationFrame ||
  window.oRequestAnimationFrame ||
  function(callback) {
  	return setTimeout(callback, 1)
  }
In the above code we try to attempting each variation of requestAnimationFrame for each browser, before falling back to our own function. This works because if you ask an object (in this case window) for a property, that doesn’t exist, it will return undefined.
let
	canvas = document.getElementById('display'),
  display = canvas.getContext('2d')

canvas.height = innerHeight
canvas.width = innerWidth

let requestAnimationFrame =
	window.requestAnimationFrame ||
  window.webkitRequestAnimationFrame ||
  window.mozRequestAnimationFrame ||
  window.msRequestAnimationFrame ||
  window.oRequestAnimationFrame ||
  function(callback) {
  	return setTimeout(callback, 1)
  }

let square = {
	x: 10,
  y: 72,
  width: 32,
	height: 32,
  speed: 2
}

let update = function() {
	if(square.x >= (innerWidth - 40)) {
  	square.x -= square.speed
    square.speed = -square.speed
  }

  if(square.x <= 10) {
  	square.x = 10
    square.speed = -square.speed
  }

  square.x = square.x + square.speed
}

let render = function() {
  // Clear the canvas, from what was drawn in the previous frame
  display.clearRect(0, 0, canvas.width, canvas.height)

  // Background
  display.fillStyle = "#202020"
  display.fillRect(0, 0, innerWidth, innerHeight)

  // Object
  display.fillStyle = "#ff0000"
  display.fillRect(square.x, square.y, square.width, square.height)

  // Draw square
  display.fill()

  // Update position of the square
  update()

  // Redraw
  requestAnimationFrame(render)
}

// Start the redrawing process
render()
requestAnimationFrame
In your animation work, you’ve used a timer loop to make changes every few milliseconds. So it’s basic API for use with animation, whether that be DOM-based styling changes, canvas or WebGL.